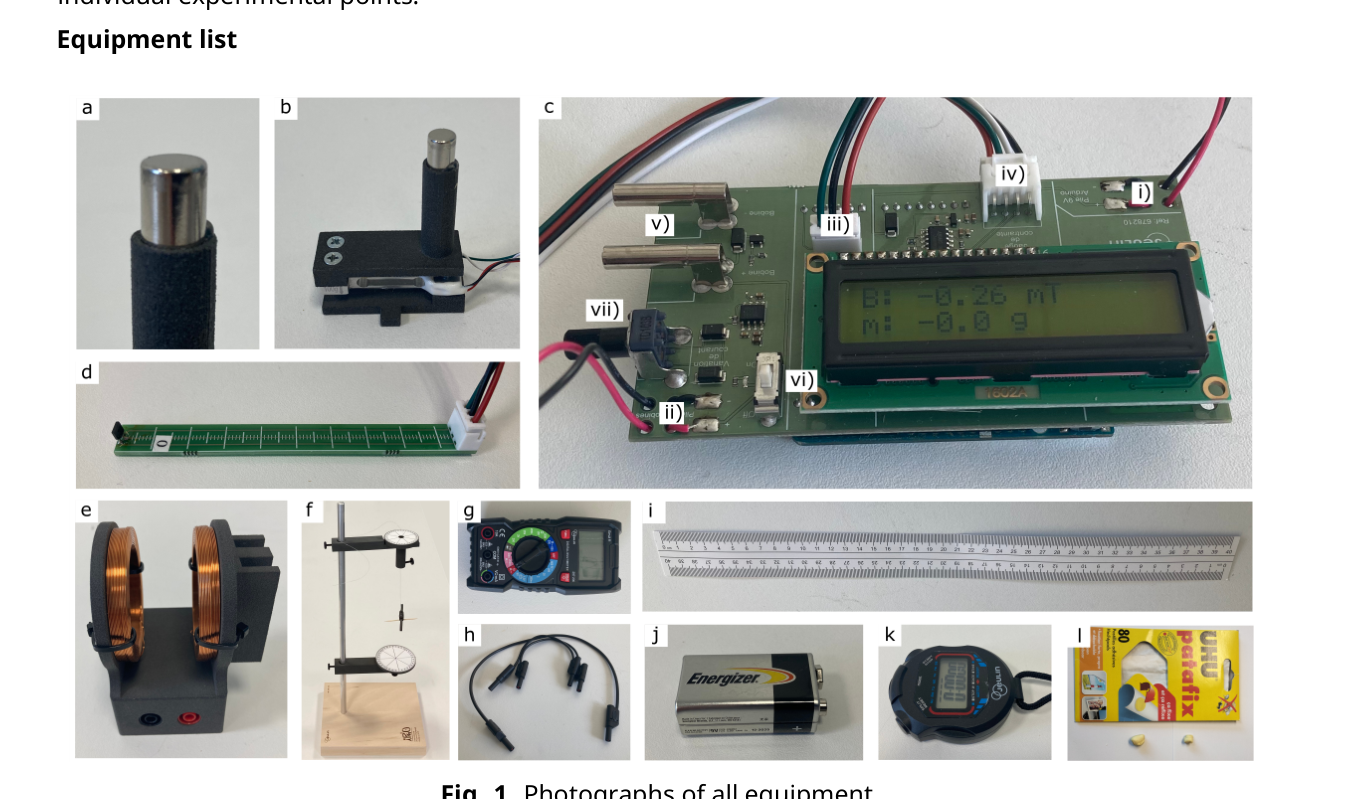
Experiment Q1-1 English (Official) Earth’s magnetic field measurement (10 points) Introduction This problem aims to measure the horizontal component of the Earth’s magnetic field. A magnet will first be characterized using a so called Gouy balance, before being used to measure this magnetic field. In the entire problem, uncertainties are expected to be determined only from the fits and not from the individual experimental points. Equipment list Fig. 1. Photographs of all equipment. The list of equipment is given below and illustrated in Fig. 1. The number of items is indicated between [] when it is greater than one. Students should ask for help if something appears not to be working. • (a) Magnets [3]. One magnet is attached to the force sensor (b) and should not be removed. Another magnet is inserted into the pod (f) and should not be removed until specified. The last one will be used in A.5. All magnets are supposed identical. • (b) Force sensor. Connected to the Arduino (c), this sensor measures the force along its axis, noted mf, in grams-force (“g”), which is the force experienced by a 1-gram mass on the earth’s surface in the gravity field (g0 = ) . One of the magnets (a) is attached to it. Each time it is switched back on, the sensor display is reset to 0, regardless of the situation. This sensor must not be subjected to forces in excess of 200 grams. It needs to be unpacked carefully. • (c) Arduino with digital display. This element is used to power the coils (e) and to perform force and magnetic field measurements, displayed directly in gram-force (“g”) and mT. The battery (j) powering the Arduino must be connected to slot (i), and the battery (j) powering the coils (e) to slot (ii) (pay attention to connection polarity). The force sensor (b) and magnetic field sensor (d) should be connected to slots (iv) and (iii) respectively, and the coil power cables to slots (v). A switch (vi) closes the coil supply circuit (indicated by an LED), whose electric current can be controlled in (vii).
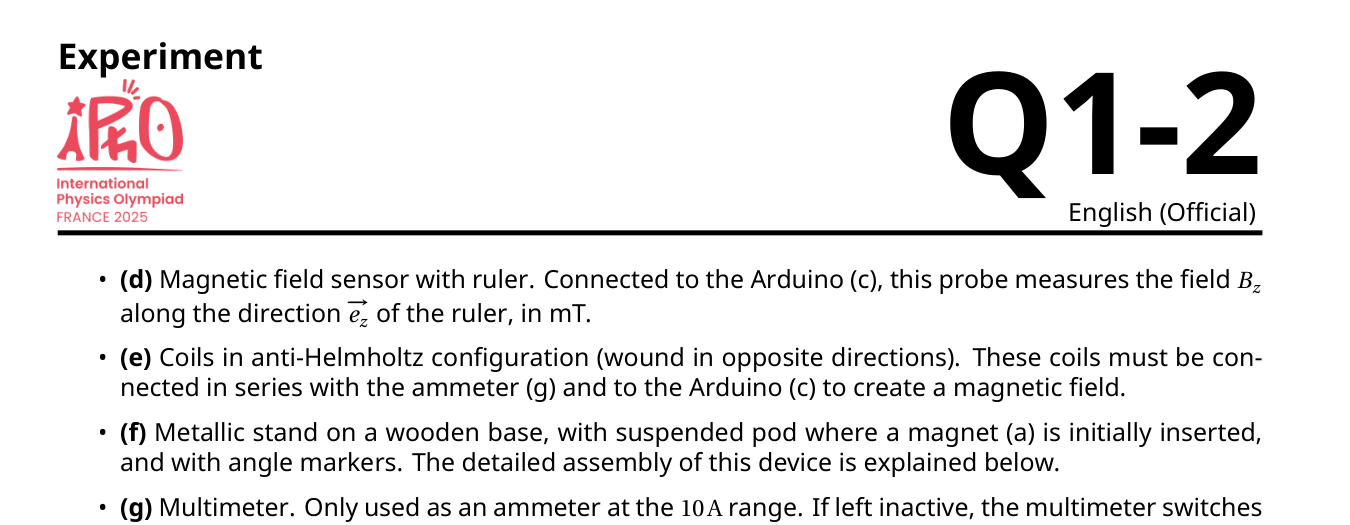
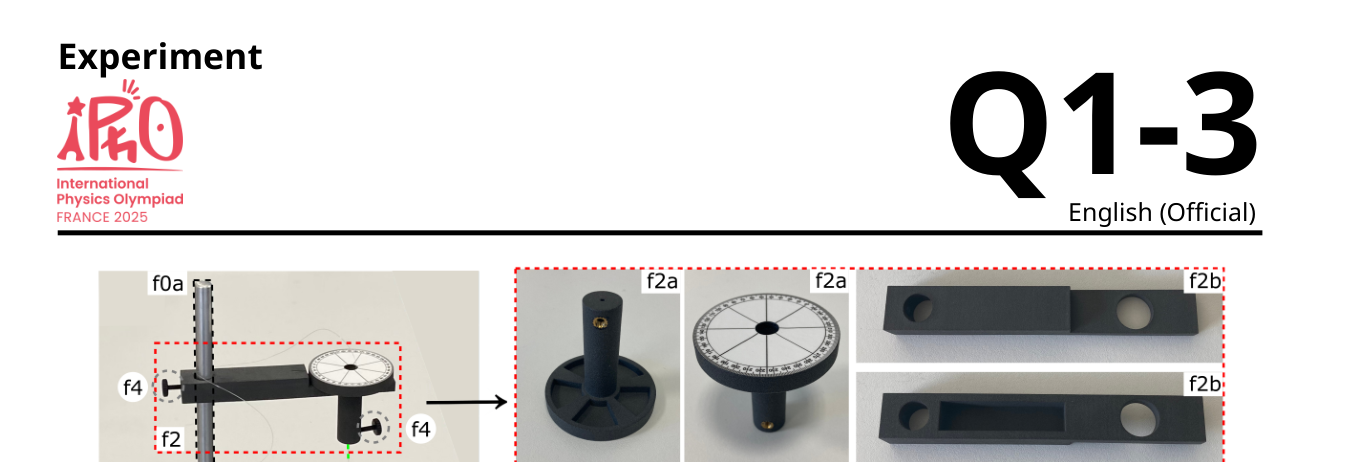
Experiment Q1-2 English (Official) • (d) Magnetic field sensor with ruler. Connected to the Arduino (c), this probe measures the field Bz along the direction ezof the ruler, in mT. • (e) Coils in anti-Helmholtz configuration (wound in opposite directions). These coils must be connected in series with the ammeter (g) and to the Arduino (c) to create a magnetic field. • (f) Metallic stand on a wooden base, with suspended pod where a magnet (a) is initially inserted, and with angle markers. The detailed assembly of this device is explained below. • (g) Multimeter. Only used as an ammeter at the 10A range. If left inactive, the multimeter switches off, and must be switched back on by returning it to the “OFF” position. Do not use the two cables supplied in the multimeter case. • (h) Electric wires [3]. • (i) 40cm ruler. • (j) 9V batteries [3]. Their capacity is of the order of . • (k) Chronometer. • (l) Adhesive paste. Can be used for the entire problem. Fig. 2. Use of sensors inside the anti-Helmholtz coils. Use of sensors interfaced with the Arduino (Fig. 2) The magnetic field sensor (d) can slide in the coils (e) as shown in (i), while measuring the field on their axis. The z= 0 position for the sensor is shown in (ii), and zincreases as it moves inside the coils. The force sensor (b) is inserted into the coils as shown in (iii), before turning the coil as in (iv) so that the transducer is vertical. To do this, be sure to route the electrical wires through the gutters provided. Installation of equipment (f) (Fig. 3), to be mounted only before starting part B, with a 34cm wire • Insert the metal post (f0a) into the wooden plate with plastic feet (f0b) to form the stand (f0). • The part (f1) is located on the lower part and marks the angle of the pod. Install the arm (f1b) on the metal post by means of a screw (f4), then fix the part (f1a) on it with a second screw (f4). • The part (f2) is located on the upper part and hold the wire supporting the pod. Install the arm (f2b) on the metal post by means of a screw (f4), then insert the part (f2a) on it. • To build the pod (f3), insert the inertia bar (f3b) and a toothpick (f3c) into the carrier part (f3a) on which a magnet (a) is already inserted. Insert the wire supporting the pod into the part (f2a), and secure it with a screw (f4). Turning part (f2a) changes the angle at which the wire is attached. The toothpick allows to precisely measure the angular position of the pod.
Experiment Q1-3 English (Official) Fig. 3. Installation of the pod on the metallic stand. Parts (f1a), (f1b), (f2a), (f2b), and (f3a) are shown from two different angles. There are four identical (f4) plastic screws. Part A. Gouy balance and magnetic moment Modeling We assume that a magnet can be treated as a magnetic dipole of magnetic moment mm. The force experienced by such a dipole of magnetic moment mm = ezin a magnetic field B= ezis F(z) = mm dB(z) dz ez. (1) When an electric current iflows through the anti-Helmholtz coils, the field Balong the unit vector ezof revolution axis is B(z) = ez. (2) This equation is only valid near the center of the device, denoted by z= z0. Magnetic field in the coils A.1 Estimate numerically the typical operating time τof one of the batteries used in the experiment, with an electric current of the order of 2A. 0.2pt This result must be taken into account when developing the protocols later on, knowing that the coils are only used in part A. Note that a spare battery is available if required.
Experiment Q1-4 English (Official) Insert the magnetic field sensor into the coils, as shown in Fig 2. See also this figure for the identification of the sensor position in the coils. A.2 At a fixed electric current i0 , measure and plot the magnetic field Bzas a function of the position zof the sensor on the axis of the coils. Identify the largest region [zmin,zmax] where the magnetic field is experimentally linear with respect to position. 0.8pt A.3 By placing the sensor at two positions (z1,z2) in this region of linear dependency, draw a curve to verify the electric current dependency of Bgiven by equation (2), and determine the value of α, with its uncertainty. 0.9pt Gouy balance Remove the magnetic field sensor from the coils, and carefully place the force sensor inside, as described in Fig. 2, with particular attention to the placement of electrical wires in the gutters. A.4 Perform experimental measurements of the gram-force mf as a function of current i. Draw an appropriate plot to determine the value of the magnetic moment mm of the magnet, with its uncertainty. 0.8pt Alternative measurement of the magnetic moment In the dipolar approximation, the magnetic field of a magnet of magnetic moment mm on its revolution axis zis Bz(z) = μ0mm , (3) where za is not necessarily the geometric center of the magnet, and where μ0 = . A.5 Measure the magnetic field Bzalong the revolution axis of the free magnet, as a function of distance z. Draw a curve to verify the model given Eq. (3), showing its experimental deviations. Deduce a new value for mm, with uncertainty. 1.3pt A.6 Given the two results obtained in A.4 and A.5, propose a final experimental value of mm with its uncertainty. 0.2pt Part B. Determining the earth’s magnetic field Modeling We now study the oscillating motion of the magnet in a horizontal plane to estimate the value of the horizontal component Be of the Earth’s magnetic field, see Fig. 3 and the assembly instructions above Fig.3. The pod (f3), containing the magnet, is subjected to two torques around the vertical axis: • the torque of the wire, modeled as Γf = ), where Cf is a constant and Lthe total length between the two attachments of the wire, and θ0 corresponds to the angle for which the wire is not twisted,
Experiment Q1-5 English (Official) • the torque of the Earth’s magnetic fiel
p.1 — Fotografie dell’attrezzatura sperimentale
p.2 — Sensori con bobine di Helmholtz
p.3 — Installazione del pod sul supporto metallico
Topic: Magnetism, Oscillations & Waves, Electromagnetism Metodi: Experimental Data Analysis, Graph Linearization, Simple Harmonic Motion Analysis, Torque & Angular Momentum Analysis, Error Propagation Competenze: Experimental Data Analysis, Graph Linearization, Error Propagation Objects: Magnet, Coil, Wire, Battery, Magnetic Dipole Fonte: Testo (PDF) — p.1 Soluzione: Soluzioni (PDF)
Experiments Q1-1 English (Official) Earth’s magnetic field measurement (10 points) The Commission This problem aims to measure the horizontal component of the Earth’s magnetic field. A magnet will first be characterized using a so called Gouy balance, before being used to measure this magnetic field. In the whole problem, uncertainties are expected to be determined only from the fits and not from the The results of the study are presented in the following sections: Equipment list
- What? 1. Photographs of all equipment. The list of equipment is given below and illustrated in Fig. 1. The number of items is indicated between [] when it is greater than one. Students should ask for help if something doesn’t seem to be working. • (a) Magnets [3]. One magnet is attached to the force sensor (b) and should not be removed. Another magnet is inserted into the pod (f) and should not be removed until specified. The last one will be used in A.5. All magnets are supposed to be identical. • (b) Force sensor. Connected to the Arduino (c), this sensor measures the force along its axis, noted mf, in grams-force (“g”), which is the force experienced by a 1-gram mass on the earth’s surface in the gravity field (g0 = ) One of the magnets (a) is attached to it. Every time it ‘s switched Back on, the sensor display is reset to 0, regardless of the situation. This sensor must not be subjected to forces exceeding 200 grams. It needs to be unpacked carefully. • (c) Arduino with digital display. This element is used to power the coils (e) and to perform force and magnetic field measurements, displayed directly in gram-force (“g”) and mT. The battery (j) powering the Arduino must be connected to slot (i), and the battery (j) powering the coils (e) to slot (ii) (pay attention to connection polarity). The force sensor (b) and magnetic field sensor (d) should be connected to slots (iv) and (iii) respectively, and the coil power cables to slots (v). Other, of a kind used for the manufacture of goods closes the coil supply circuit (indicated by an LED), whose electric current can be controlled in (vii).
Experiments Q1-2 English (Official) • (d) Magnetic field sensor with ruler. Connected to the Arduino (c), this probe measures the field Bz along the direction ezof the ruler, in mT. • (e) Coils in anti-Helmholtz configuration (wound in opposite directions). These coils must be connected in series with the ammeter (g) and to the Arduino (c) to create a magnetic field. • (f) Metallic stand on a wooden base, with suspended pod where a magnet (a) is initially inserted, and with angle markers. The detailed assembly of this device is explained below. (g) Multimeter. Only used as an ammeter at the 10A range. If left inactive, the multimeter switches off, and must be switched back on by returning it to the OFF position. Don’t use the two cables Supplied in the multimeter cases. • (h) Electrical wires [3]. • (i) 40 cm ruler. • (j) 9V batteries [3]. Their capacity is of the order of . (k) Chronometer. • (l) Adhesive paste. Can be used for the whole problem.
- What? 2. Use of sensors inside the anti-Helmholtz coils. Use of sensors interfaced with the Arduino (Fig. 2) The magnetic field sensor (d) can slide in the coils (e) as shown in (i), while measuring the field on their Axis. The z=0 position for the sensor is shown in (ii), and zincreases as it moves inside the coils. The force sensor (b) is inserted into the coils as shown in (iii), before turning the coil as in (iv) so that the The transducer is vertical. To do this, be sure to route the electrical wires through the gutters provided. Installation of equipment (f) (Fig. 3), to be mounted only before starting part B, with a 34 cm wire • Insert the metal post (f0a) into the wooden plate with plastic feet (f0b) to form the stand (f0). • The part (f1) is located on the lower part and marks the angle of the pod. Install the arm (f1b) on the metal post by means of a screw (f4), then fix the part (f1a) on it with a second screw (f4). • The part (f2) is located on the upper part and hold the wire supporting the pod. Install the arm (f2b) on the metal post by means of a screw (f4), then insert the part (f2a) on it. • To build the pod (f3), insert the inertia bar (f3b) and a toothpick (f3c) into the carrier part (f3a) on which a magnet (a) is already inserted. Insert the wire supporting the pod into the part (f2a), and secure it with a screw (f4). Turning part (f2a) changes the angle at which the wire is attached. The Toothpick allows to precisely measure the angular position of the pod.
Experiments Q1-3 English (Official)
- What? 3. Installation of the pod on the metallic stand. Parts (f1a), (f1b), (f2a), (f2b), and (f3a) are shown from two different angles. There are four identical (f4) plastic screws. Part A. Gouy balance and magnetic moment Modelling We assume that a magnet can be treated as a magnetic dipole of magnetic moment mm. The force experienced by such a dipole of magnetic moment mm = Magnetic field ezin B= Other F(z) = mm dB(z) dz ez. (1) When an electric current flows through the anti-Helmholtz coils, the field Balong the unit vector Other The revolution axis is B(z) = ez. (2) This equation is only valid near the center of the device, denoted by z=z0. Magnetic field in the coils A.1 Estimate numerically the typical operating time τof one of the batteries used In the experiment, with an electric current of the order of 2A. 0.2pt This result must be taken into account when developing the protocols later on, knowing that the coils are only used in Part A. Note that a spare battery is available if required.
Experiments Q1-4 English (Official) Insert the magnetic field sensor into the coils, as shown in Figure 2. See also this figure for the identification of the sensor position in the coils. A.2 At a fixed electric current i0 , measure and plot the magnetic field Bzas a function of the position of the sensor on the axis of the coils. Identify the largest region [zmin,zmax] where the magnetic field is experimentally linear with respect for position. 0.8pt A.3 By placing the sensor at two positions (z1,z2) in this region of linear dependence, draw a curve to verify the electric current dependency of Given by equation (2) and determine the value of α, with its uncertainty. 0.9pt The balance of the Remove the magnetic field sensor from the coils, and carefully place the force sensor inside, as described in Fig. 2, with particular attention to the placement of electrical wires in the gutters. A.4 Perform experimental measurements of the gram-force mf as a function of current i. Draw an appropriate plot to determine the value of the magnetic moment mm of the magnet, with its uncertainty. 0.8pt Alternative measurement of the magnetic moment In the dipolar approximation, the magnetic field of a magnet of magnetic moment mm on its revolution axis zis Bz(z) = μ0mm , (3) where za is not necessarily the geometric center of the magnet, and where μ0 = . A.5 Measure the magnetic field Bzalong the revolution axis of the free magnet, as a function of distance z. Draw a curve to verify the model given Eq. (3) showing The Commission is not prepared to accept the proposal. It deduces a new value for mm, with uncertainty. 1.3pt A.6 Given the two results obtained in A.4 and A.5, he proposed a final experimental value of mm with its uncertainty. 0.2pt Part B. Determining the Earth’s magnetic field Modelling We now study the oscillating motion of the magnet in a horizontal plane to estimate the value of the horizontal component Be of the Earth’s magnetic field, see Fig. 3 and the assembly instructions above Figure 3. The pod (f3), containing the magnet, is subjected to two torques around the vertical axis: • the torque of the wire, modelled as Γf = ), where Cf is a constant and Lthe total length between the two attachments of the wire, and θ0 corresponds to the angle for which the wire is not twisted,
Experiments Q1-5 English (Official) • the torque of the Earth’s magnetic field
p.1 — Fotografie dell’attrezzatura sperimentale
p.2 — Sensori con bobine di Helmholtz
**p.3 ** Installation of the pod on the metal support
Topic: Magnetism, Oscillations & Waves, Electromagnetism Metodi: Experimental Data Analysis, Graph Linearization, Simple Harmonic Motion Analysis, Torque & Angular Momentum Analysis, Error Propagation Competenze: Experimental Data Analysis, Graph Linearization, Error Propagation Objects: Magnet, Coil, Wire, Battery, Magnetic Dipole Fonte: Testo (PDF) — p.1 Soluzione: Soluzioni (PDF)